ഇതുണ്ടെങ്കിൽ ഗ്യാസും, ഇൻഡക്ഷൻ കുക്കറും വേണ്ട! ഇനി പാചകം ചെയ്യാൻ മിനിറ്റുകൾ മാത്രം മതി! ചെടിച്ചട്ടി കൊണ്ട് ഒരു കിടിലൻ അടുപ്പ്!! | Chedichatti Aduppu Making
Chedichatti Aduppu Making
Plant Pot Stove Making at Home Easily
Chedichatti Aduppu Making : A plant pot stove is a simple DIY cooking stove made using clay pots. It is commonly used for outdoor cooking or emergency use and helps save fuel while providing steady heat with minimal materials.
Top Benefits of Plant Pot Stove
- Fuel Efficient – Uses less firewood or charcoal for cooking.
- Low-Cost DIY Stove – Made using easily available clay pots.
- Good Heat Retention – Clay helps maintain steady cooking temperature.
- Useful for Outdoor Cooking – Ideal for gardens, backyards, or travel use.
- Simple & Practical Design – Easy to make and use at home.
ഗ്യാസും ഇൻഡക്ഷനും വേണ്ട ചെടിച്ചട്ടി ഉപയോഗിച്ച് അടുപ്പ് തയ്യാറാക്കാം! പാചകവാതക വില ദിനംപ്രതി വർദ്ധിച്ചു വരുന്ന സാഹചര്യത്തിൽ സാധാരണക്കാരായ ആളുകൾക്ക് ഉയർന്ന വില കൊടുത്ത് മാസാമാസം ഗ്യാസ് സിലിണ്ടർ ബുക്ക് ചെയ്യുക എന്നത് എളുപ്പമുള്ള കാര്യമല്ല. അതിനു പരിഹാരമായി ഇൻഡക്ഷൻ സ്റ്റൗ ഉപയോഗിച്ചാലും കരണ്ട് ബില്ലിന് ഒരു വലിയ തുക നൽകേണ്ടി വരും. എന്നാൽ ഇതൊന്നും ഇല്ലാതെ വളരെ എളുപ്പത്തിൽ
ഒരു ചെടിച്ചട്ടി ഉപയോഗിച്ച് എങ്ങനെ അടുപ്പ് തയ്യാറാക്കി എടുക്കാം എന്നാണ് ഇവിടെ വിശദമാക്കുന്നത് അടുക്കളയിലേക്ക് ആവശ്യമായ എന്ത് ഭക്ഷണവിഭവങ്ങളും ഈയൊരു അടുപ്പിൽ വളരെ കുറഞ്ഞ സമയത്തിനുള്ളിൽ തന്നെ തയ്യാറാക്കി എടുക്കാവുന്നതാണ്. അതിനായി യാതൊരു ചിലവും വരുന്നില്ല. ഈയൊരു അടുപ്പ് തയ്യാറാക്കാനായി ആവശ്യമായിട്ടുള്ളത് അത്യാവശ്യം വലിപ്പത്തിലുള്ള ഒരു ചെടിച്ചട്ടി, അതിനകത്ത് ഇറക്കിവയ്ക്കാൻ വലിപ്പത്തിൽ ഒരു പെയിന്റിന്റെ പാട്ട,
Plant Pot Stove Pro Tips
- Use thick, good-quality clay pots to avoid cracks from heat.
- Make proper air holes at the bottom for better fire flow.
- Always place the stove on a flat, fire-safe surface while using.
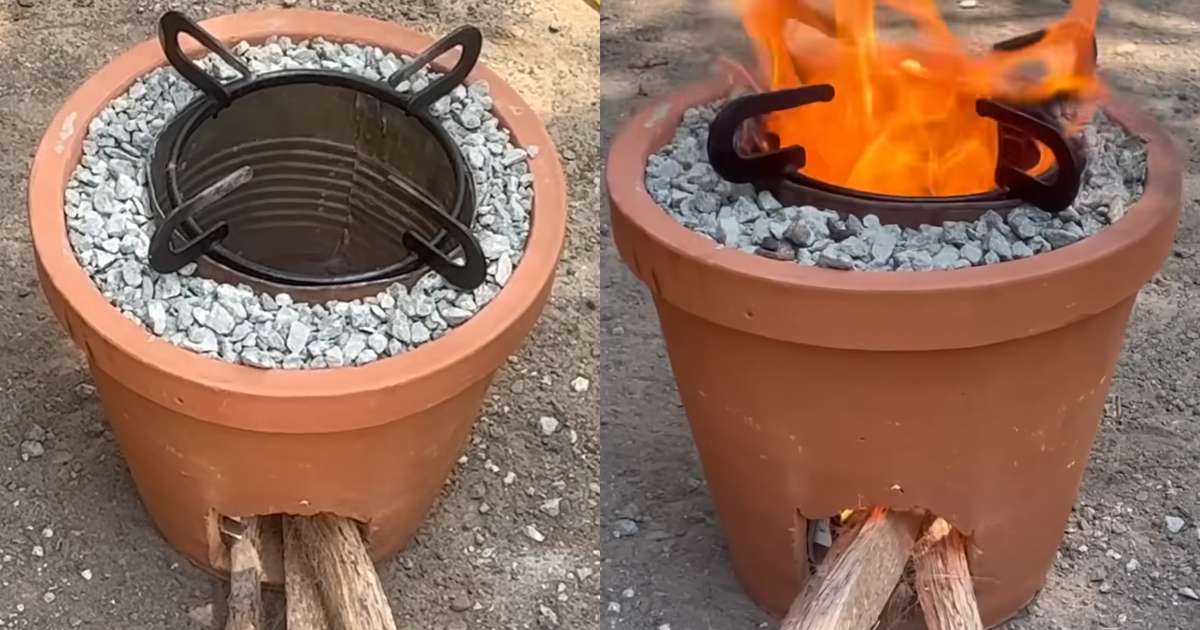
ഒരു ചെറിയ പാട്ട, അകത്ത് നിറയ്ക്കാൻ ആവശ്യമായ ബേബി മെറ്റൽ അല്ലെങ്കിൽ ഇഷ്ടിക പൊടിച്ചത് ഇത്രയുമാണ്. ആദ്യം ചെയ്യേണ്ടത് ചെടിച്ചട്ടിയുടെ മുൻവശത്തായി വിറക് വയ്ക്കുന്നതിന് ഒരു ഹോൾ ഇട്ട് നൽകണം. ഇത് കൃത്യമായി വരച്ച് ഒരു മാർബിൾ കട്ടർ അല്ലെങ്കിൽ ഹാമർ ഉപയോഗിച്ച് പൊട്ടിച്ച് എടുക്കാവുന്നതാണ്. അതിനു ശേഷം അകത്ത് ഇറക്കി വയ്ക്കാനായി വലിയ പാട്ടയുടെ അടിവശം കട്ട് ചെയ്യുക. മുകളിലേക്ക് കൂടുതൽ നീളമുണ്ടെങ്കിൽ ആ ഒരു ഭാഗവും ചട്ടിയുടെ വട്ടത്തിൽ മുറിച്ച് മാറ്റണം. ശേഷം ഇതിന്റെ നാല് വശവും ബേബി മെറ്റൽ ഇട്ട് സെറ്റ് ചെയ്തു കൊടുക്കുക. ഇത്രയും ചെയ്താൽ അടുപ്പ് റെഡിയായി കഴിഞ്ഞു.
മുഗൾഭാഗത്ത് ഗ്യാസിന്റെ ബർണർ വച്ച് സെറ്റ് ചെയ്യാവുന്നതാണ്. ഗ്യാസ് അടുപ്പ് റെഡിയായി കഴിഞ്ഞാൽ അടി ഭാഗത്ത് രണ്ടോ മൂന്നോ ചെറിയ വിറകു കഷണങ്ങൾ കത്തിച്ച് ചൂടാകാനായി ഇട്ടു കൊടുക്കാവുന്നതാണ്. അപ്പോൾ അതിൽ നിന്നും മുകളിലേക്ക് ചൂട് വന്നു തുടങ്ങും. അടുക്കളയിലേക്ക് ആവശ്യമായ ഏതു ഭക്ഷണ വിഭവങ്ങൾ വേണമെങ്കിലും ഈ ഒരു ചൂടിൽ വളരെ കുറഞ്ഞ സമയത്തിനുള്ളിൽ തന്നെ തയ്യാറാക്കി എടുക്കാവുന്നതാണ്. അടുപ്പ് തയ്യാറാക്കേണ്ട രീതി വിശദമായി മനസ്സിലാക്കാൻ വീഡിയോ കാണാവുന്നതാണ്. Chedichatti Aduppu Making Video Credit : Vichus Vlogs
Plant Pot Stove Making – Simple DIY Clay Stove at Home
A plant pot stove is a low-cost, eco-friendly DIY stove made using clay or cement plant pots. It’s commonly used for outdoor cooking, emergency backup, or traditional-style heating. With basic materials and careful setup, you can make a sturdy stove that works with charcoal or wood and retains heat efficiently.
Key Tips for Making a Plant Pot Stove
- Choose Thick Clay or Cement Pots – Thicker pots hold heat better and last longer.
- Create Proper Airflow Holes – Small side openings help fuel burn evenly.
- Use Heat-Resistant Base – Place the stove on bricks or a non-flammable surface.
- Ensure Pot Stability – Secure the pot firmly to avoid tipping during use.
- Use Outdoors Only – Proper ventilation is essential for safe use.
FAQs
1. What fuel can be used in a plant pot stove?
Charcoal, wood pieces, or dry biomass are commonly used.
2. Is a plant pot stove safe for indoor use?
No, it should be used only outdoors or in well-ventilated open areas.
3. How long does the stove retain heat?
Clay pots retain heat well, making cooking more efficient.
4. Can broken pots be repaired?
Minor cracks can be sealed, but damaged pots should be replaced for safety.
5. Is this suitable for regular cooking?
It’s best for occasional or outdoor use, not as a permanent kitchen stove.